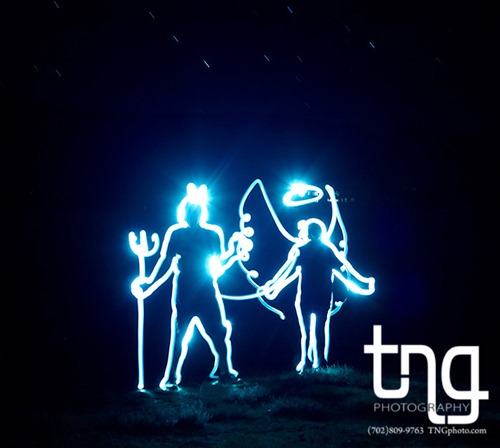
I have a special Guest Post “How To” in Photography for you! T. Nathan Grant owns TNG Photography here is Las Vegas. His work is pretty impressive, and expansive. I’d love to have Nate write a regular series here on Our Knight Life. So if you get a chance after reading this, be sure to ask any questions you may have about photography, family images, or how to use your camera. Maybe one day Nate will answer your question in a post!
Please make sure you give TNG Photography a like on Facebook. All you have to do is click the button below. You are sure to find great tips and fun photos on his page in addition to great local deals!
Remember how excited you were when you got that that nice camera you got on a birthday, holiday or when your husband wanted to apologize for forgetting your anniversary? When was the last time you used it? Wait! Wait! Maybe I shouldn’t ask. For conversation sake, I’ll assume you haven’t touched it in a while. No worries though because I have a fun little trick that anyone with a camera can try and enjoy. It’s called LIGHT WRITING!
You will need:
- A steady surface for the camera (a tripod is preferable)
- Your camera must have a MANUAL mode or a SHUTTER SPEED PRIORITY MODE (sometimes marked as Tv)
- Dark, pitch black room or just wait until night time and go into your backyard and turn off all the lights before taking the picture.
Without going into too great of detail on camera settings, light writing is simply exposing your picture for a longer period of time (around 30 seconds) in a pitch black space but using a flash light in the darkness to write messages, draw, squiggle, etc. It’s a lot of fun! Here’s an example!
Step 1: Place camera on tripod or steady surface. The key is to make sure your camera doesn’t move.
Step 2: Point your camera off at a pitch black area.
Step 3: Have someone turn a flashlight on and stand out where you’d like them to light write.
Step 4: Focus on them now with their flashlight on. If you don’t focus now, your photo will be blurry because your camera can’t focus on just plain black background.
Step 5: If your camera has a manual mode, set your shutter speed to 30 seconds. If it does not have a manual setting, change the camera over to shutter speed priority. Set this to 30 seconds. Some lower quality cameras can only be set to 15 seconds as the longest shutter speed. That’s still ok but you’ll be a little more limited to what you can do with your light writing. The longer the better!
Step 6: Turn on the flashlight and point it towards the camera.
Step 7: Once you click the camera to take the picture, the person with the flashlight needs to draw something in the air. Start with something simple like a circle.
TIP: When writing words, remember you have to write the letters backwards from right to left so that when the picture appears on camera it will spell out accurately what you have painted with the flashlight. It can be tricky at first but you’ll get used to it. Also, (very important) turn OFF the flashlight between each letter otherwise you’ll have light trails joining each letter and it won’t be legible.
Step 8: Look at how great the picture looks on the camera and then get creative!
LIGHT WRITING is actually how I proposed to my wife a few years ago. It was midnight at my dad’s house in a little town called New Harmony, Utah. I took her outside into the dark backyard and to try to not to give away my intentions, we painted a few funny light writings before I said, “How about we write a question then the next person has to answer it?” Kendra agreed and my heart was pounding from here on out:
Try it out, if you have any questions, feel free to ask then make sure you show us what you come up with! Have fun!
About TNG Photography and T. Nathan Grant

Visit TNGphoto.com to learn more.
Latest posts by Emily (Posts)
- Don’t Call It A Comeback - February 7, 2019
- The Little Prince at The Smith Center Las Vegas – Ticket Giveaway - January 31, 2017
- 3 Simple Ways To Add Color To Your Diet @SUBWAY @OfficialSubway - January 13, 2017
- Disney’s Moana in Dolby Cinema at AMC Movie Review - November 27, 2016


Such a great photography tutorial!
Thank you, Brandie! I’m glad you enjoyed it. Let me know if you have any questions!
This is great! Thanks!
How neat! I am so excited to try this! And I love how you explained it to someone like me, who really has no idea what all the settings on my camera are. I have manual mode and don’t know how to use it. I would love to see posts on basic situations we are all in and how best to deal with them – for example, taking trick or treat photos in the dark, or some tips with dealing with getting good photos of excited kids who won’t sit still on Christmas morning.
I love light writing! Super cute way to propose too! 🙂
I’m pinning this to try with the boys. With the long darkness of winter, we should have plenty of opportunity.
What a neat idea. I am going to have to try this!
super useful, thanks!
That is super neat. Great tutorial!
I’ve always wondered about this. Can it be done with any lens or does it do better with a prime like 50mm? and with the SS set to 30 seconds does that mean the person has 30 seconds to write or draw whatever they are wanting to do?
Hi, Leigh! I’m glad everything made sense. 🙂 I’ll talk to Emily about other possible topics and situations that I can touch on in future articles. By the way, for trick or treating photos in the dark, bring a bright flashlight with you (LEDs work nicely) so you can shine it on your kids while the camera is auto-focusing. A camera focuses on points of contrast so the light on your kids from your flashlight should make them the most contrasting element against the dark backgrounds. I carry this little light around with me when I know I’m going to be somewhere with very low light that will make my camera a pain to focus with (such as a wedding reception) : http://www.amazon.com/Joby-Gorillatorch-Adjustable-Flexible-Flashlight/dp/B002IT5DIU/ref=sr_1_1?ie=UTF8&qid=1351578508&sr=8-1&keywords=gorilla+light
Also Off the top of my head, bring your camera down to their level (or a little bit lower) and get right in on the action when they are at a front door. It’ll be fun to see the image from their perspective.
As for the kids on Christmas morning, there are a number of ways to get good images of them. I always figure that young children have an attention span that’s no longer than their age. IE: 2 year olds might give me 2 minutes before they get bored of me and want to go do something else. To combat this, I’ve found it’s best to take the attention off of them and onto something else. Never tell the child, “Don’t smile like that!” or “No! You’re real smile! That one’s ugly!” Negativity never brings out the best expressions from kids. Instead, I sometimes like to play little games with them so they feel like they are playing as opposed to having a photograph made. One of my favorite things to do is tell the child, “We’re going to play a game. I’ll be the monster and when I get close to you, you have to say. ‘RAWR!!!!’ to scare me away!” Then I’ll walk towards them, acting like a monster and then they’ll make a RAWR! at me and I’ll run away scared and they smile and laugh. Then I can get the shot I’m wanting and the look is always better than a fake, “SAY CHEESE!” smile.
I hope that answered your questions. 🙂 Thanks again!
Jennifer, any focal length will do. 50mm will work, as will 24mm, 85mm, 135mm, etc. etc. It might be a good idea to set your camera up then mark on the ground how far left or right the person doing the light writing can go before being outside of the frame.
With the SS set to 30 seconds, yes, the person writing will have 30 seconds to write something. You know when you take a picture and you hear the camera go, “CLICK!”? The shutter speed (SS) is clicking rather quickly. With the SS set to 30 seconds it won’t go “CLICK!” very quickly but instead you’ll hear your camera make a “CLICK” then a long 30 second pause before you hear the second “CLICK!” The first click is the shutter opening and the second is it closing. IE: CLICK!……………………….30 seconds……………………….CLICK! You’ll then have your picture.
I hope that all makes sense. 🙂
I had absolutely no idea that was even possible. So incredibly cool!
Wow, that is so cool! I have to try it, I have no idea if I have those settings on my camera though.
This is AMAZING!!! I am going to have to try this out sometime.
So neat!
The blog is absolutely fantastic. Lots of great information and inspiration, both of which we all need.
yes right knight life…
Can anyone Suggest me good wireless video camera for monitoring my baby. one of my friend suggest me motorola. what you think ?